Planner Dashboards available in various sizes

Planner Dashboards available in various sizes
Visit my Etsy Shop

Sunday 30 March 2014

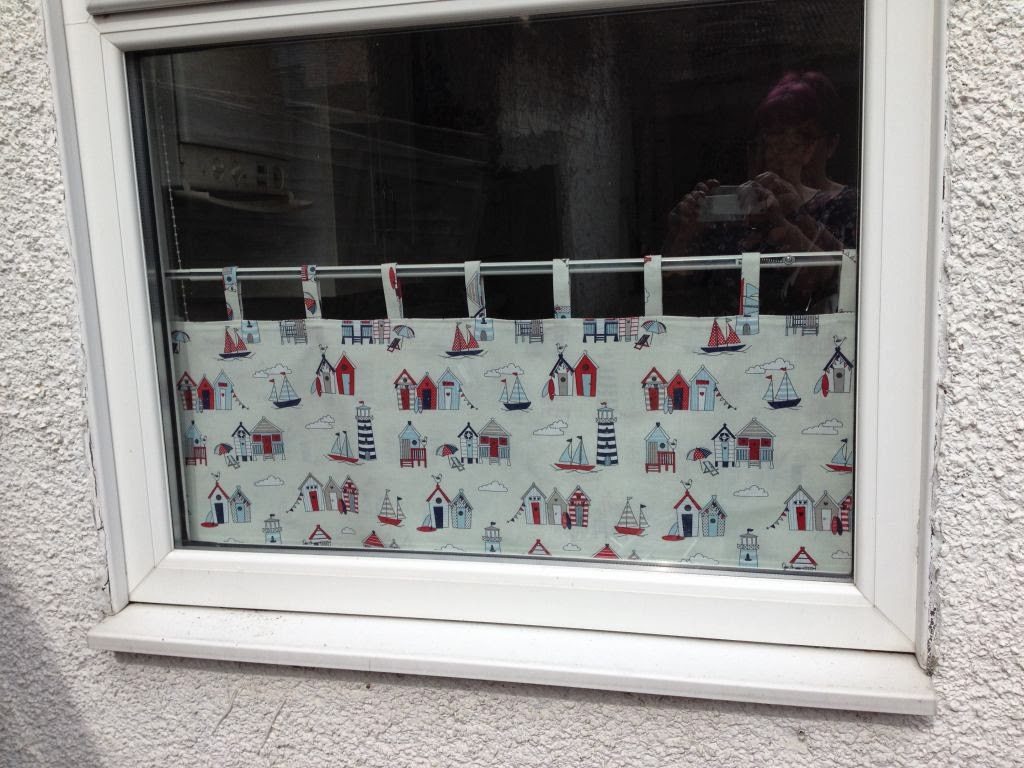
Kitchen window is now 'dressed' :-)


I have been in this flat 2 years and just decided that the kitchen window needed 'dressing' lol

A couple of weeks back, my friend, Kim & I went to the Knitting & Stitching Show at Olympia, London and naturally we both bought some fabric - as you do !!

My little kitchen is mainly red so when I saw this beach themed fabric with the lovely bright red in it, I decided that it needed to become a cafe style curtain for the kitchen.

It then took me another 2 weeks to buy the tension rod - and the shop that sells them is less than 100 yards away. BUT, I did get one so this morning, I set about measuring the window etc etc 

All was going well. I cut all the fabric to the right size. I patiently sewed 9 tabs all ready and I was away. I pinned the tabs on and stitched the 2 pieces of highly pressed fabric together.............

THEN I realised that instead of pinning the tabs between the 2 pieces of fabric, I had pinned them to the outside. So naturally when I turned the piece right side out, the dam tabs were still on the inside !!

So, out came the quick unpick and I started again. I made sure I got it right the 2nd time.

I am now very happy with the final piece :-) 

Hope you like it and thanks for stopping by my blog today x


post signature

Card I made for my mum for Mothers Day


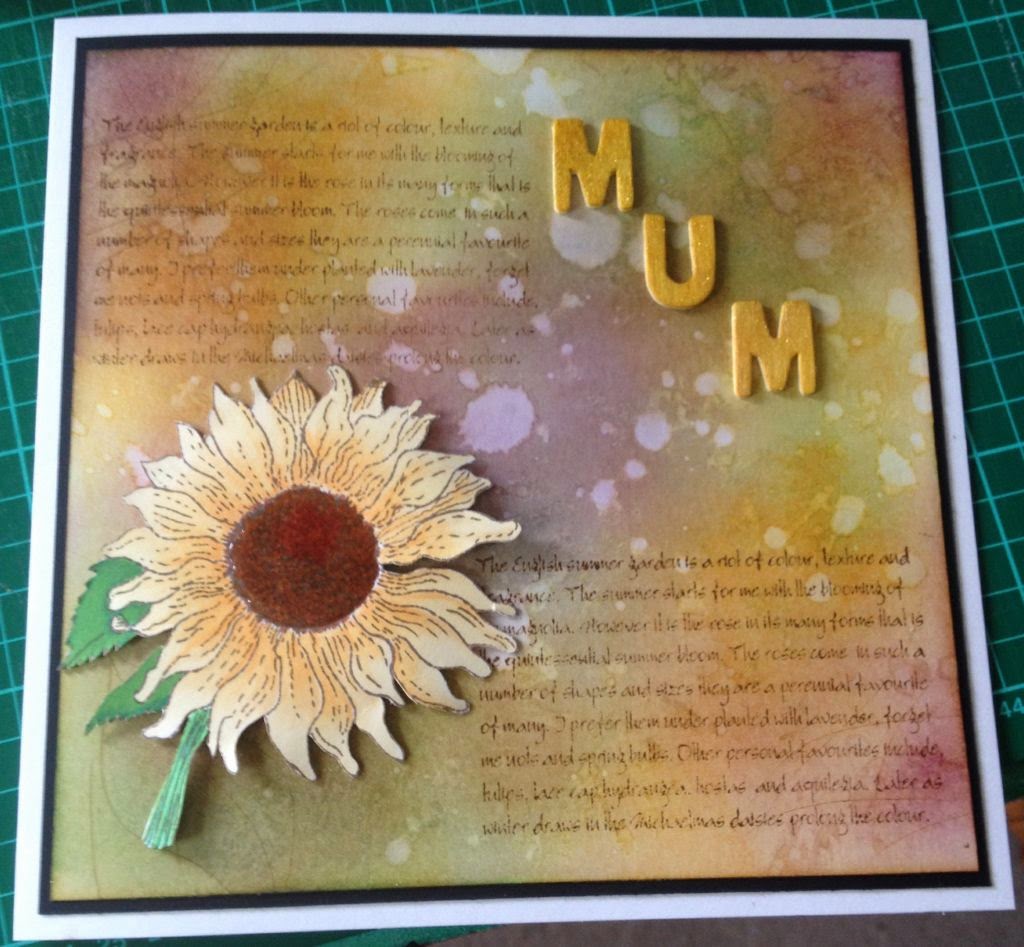
Well here it is. The card I made for my mum for Mothering Sunday (here in the UK anyway).

To start I cut a piece of centura pearl card stock to measure 7.5" square. Using the non pearlised side, I used Tim Holtz Distress inks all over the piece. I used seedless preserves, peacocks feathers, mustard seed & wild honey predominantly. I spritzed the card stock with water and let it 'do it's thing' for a moment or two and then blotted it off with a piece of kitchen roll. 

I then used the blade of a scalpel in the corners, as I had seen Sheena Douglas do, to scour the corners and went over lightly with gathered twigs distress ink. 


I dried it all off with a heat gun and using 'mushroom' adirondack ink, stamped into the 2 corners with a word stamp from Oak House Studio's. 

Next, using the same mushroom ink pad and the sunflower stamp from Oak House Studio's, I stamped onto another piece of centura pearl card stock - again using the reverse side. I then coloured the sunflower with Gold / mustard & buttercup promarkers. The centre was also coloured with promarkers using various shades of browns including umber & burnt umber. I used a 'pouncing' motion to give the effect seen in a real sunflower. The leaves were coloured with pine / forest & moss promarkers. I cut it out and mounted it onto the card with foam pads.

To finish, I added diamond glaze to the ..... no I didn't.. I tell a lie.. I used glossy accents in the centre of the sunflower. 


I added the word 'mum' using 3 wooden letters coloured with mustard seed and edged with a bit of gathered twig distress ink. Then sprayed with some gold mica spray.

The card stock was matted onto a layer of black card stock which I had previously measured & gutted so as not to waste the central panel.

If I am matting card on card, then I will gut the bottom layer. If using paper on card though, then I don't. In my opinion it acts as a support layer. It's all personal choice though. 

Hope you like it and thank you for stopping by my blog today x


post signature

Friday 28 March 2014

Fairy dust everywhere ... oh & a new card for an order !!

Here we have a birthday card made this evening which also resulted in me spilling some gold mica powder so I know have sparkly dust in my flat :-) 

Any-ways, here's the recipe....

Firstly, I apologise for the photographs. The bulb in my ottlite has blown so I am having to use an LED desk light - and its just not the same. I am the case of getting it replaced.. I miss it.

I have used loads of products from different companies so be warned....

Whilst having a clear out t'other month, I came across a pack of papermania "confetti" paper so have used this throughout. I thought it was beautiful when I bought it and I still do.

I mat & layered a square piece onto black card & attached to a 8x8 card blank.

Using the same black card stock and a Dreamees Cuttables Vol 3  I cut the mannequin.  It doesn't show up on the photo too well but you can see it much better in real life. Then from the pattered paper I cut the dress and some of the flowers. The rest of the flowers were cut from Sue Wilson's 'classic rose' die.

I ran a rectangle of black card through the ebosser using the free embossing folder and wiped it over gently with clear perfect medium. THIS is where I created the fairy dust !! I got the pot of mica down, dusted the embossed card and then slipped when putting the lid back on. There's still 3/4 of a pot left so not too much went to waste. The rest is now floating around my flat !!!!

I also cut a corner from the Create & Craft Die-lectables range - this one is from the Dragon fly corner set. 
The happy birthday sentiment is from Rob Adams range of dies.


So then it was a case of shaping the flowers and putting it all together.
I added some flat backed pearls and card candi to the flowers et voile - the card is finished.


Thank you for stopping by my blog today x

post signature

Wednesday 26 March 2014

Liebster Blog Award :-)


Today, I have been awarded The Liebster Blog Award by Anna over at Mrs Brimbles 
The aim of the award is to get more blog readers.
 My opinion is that by branching out you can take yourself out of your comfort zone and broaden your outlooks. I don't believe in sticking to the same genre of blogs as what I write. I use the same philosophy on Twitter too, that way, in theory anyway, it won't become stale. 

So, onto The Liebster Blog Award................

I have been set 11 questions by Anna. In return, I have to nominate other blogs and set them 11 questions, and so on and so on. 
If I do nominate you and you choose not to participate, this is perfectly okay. No 'blog police' are going to come and drag you off to 'blog prison'. Just delete and move on. No nasty comments, no rants. Just a simple act of deletion. Life is better that way.

Here we go then .....................

Question 1 - Why did you start blogging ...

I started blogging on Friday 2nd May 2008 - was it really that long ago ???? That's almost 6 years ago!!! Wow. That is a shock to me let alone anyone else. I started purely as a showcase for the cards I make and also just to have somewhere to write about 'stuff'.  Lots of posts since then about things I would like to forget but hey ho, that was my life back then and its all in the past now.

Question 2 - What do you blog about...

Mainly now, I blog about the cards I have made. I add the 'recipe' so that other crafters can see what products I have used. Occasionally I blog about other things, as and when the mood takes me.

Question 3 - Why do you blog about that ...

Because some people like to see how things are done :-) 

Question 4 - is blogging for business or for a hobby? Why?

When I started, it was purely for pleasure, and in the most it still is. I do use it as a showcase for my bespoke, handmade card business now so, for now, its a bit of both. It suits my needs that way 

Question 5 - How often do you blog? Do you have a routine / set blogging schedule?

I blog as and when. I don't have a set time and if I make a card and don't blog about it, then I don't worry about it at all. Life is too short to stress about a blog post.

Question 6 - How do you organise your blog posts / what to blog about

A blog post is determined by whether I have made a card or not. Simple as that x

Question 7 - where do you get your inspiration from?

Inspiration for the blog post is easy - that comes from the card I have just made. The inspiration for the card itself ? well that's a different matter. If I have been given a brief by a client, I take everything into consideration. If not, I can allow my creative mind to run free and the design just 'pops out'. I read a lot of craft magazines and I watch Create & Craft on the TV. They both fill me with inspiration. I also go to as many craft shows as I can afford to. I like these as I get to meet people and see what other people are doing. The creativity flows at these events.

Question 8 - what do you see as your blogging future?

No immediate plans to change the format for now. But who knows where my blogging will take me

Question 9 - Any tips for bloggers starting out? Or if you are just starting out what would you like to know?

Don't think too hard. Go with the flow. If you don't like what you have written, delete it. 

Question 10 - Your favourite social media platform and why?

Twitter - will always be my number one favourite social media platform. I do use the other platforms but I have made more contacts and true friends through Twitter. My best friend, Jax, is on Twitter and that's where we met. It is becoming more of a selling platform lately and I will hold my hand up and say I do promote my site & charity things on there too. But some people purely use twitter to see what sales they can get out of it and that is wrong. Interact with people, make friends. Depending on what twitter client you use though, there are ways to mute what you don't want to see, so I make full use of these where I can. You must talk to people though - not bombard them with linked posts from other pages. And my biggest bug bear is linking facebook posts to the twitter feed. I am convinced some people don't realise that if you post 10 pictures in a FB album, it comes through as 10 separate posts in your twitter timeline. Thankfully, you can also mute certain clients so I no longer see duplicated posts from facebook on my Twitter Timeline. 

Oh dear, went off on a bit of a tangent there lolol 

Question 11- A random, quirky, fun fact about you?

When Mark Foster, the very handsome & very tall swimmer, lived in St. Neots, he would come into the restaurant I worked at most Saturdays when he wasn't training and enjoyed a 'big breakfast'. He was handy at Christmas when I needed a hand putting the Christmas decorations up lol And when he turned the Xmas lights on in St. Neots a couple of years back, he remembered who I was - even my name :-) 


So, there we go. My answers to Anna's questions. 

Now comes the tough part, tagging others and setting the questions .................

Jacqui Hall - better know as Jax   A fellow crafter and my best mate x

Darcy - An inspirational crafter with lots of techniques under her belt. Pop over to her blog here 

Billies craft room   As the title implies - its all about the journey 

JenniBellie Studio Some lovely art work and watch her on YouTube too 

Daisy Yellow Art - Tammy has lots of lovely artwork on her page 

I know its not the required number (sowwee lol)

11 questions .... (erm, where do I start???)

Question 1   what's the weather like where you are RIGHT now? Come on, up off your chair and go look...

Question 2   where is your favourite place to go on holiday?

Question 3  How many rooms in your home?

Question 4  what's your favourite colour?

Question 5  what was your last blog post about and why did you write it?

Question 6  You can have 4 guests for dinner (alive or dead) - who would you choose and why?

Question 7  what was the last song you listened to?

Question 8  favourite film of all time

Question 9  red? white? rose?

Question 10  name of your first school and your favourite teacher

Question 11  (and the last one, you'll be happy to know)  what is YOUR best feature / attribute?


So thats it, off to tag people now :-) 


Sunday 23 March 2014

Funny Monkey card for an order

Hi bloggers, today I have another commissioned card for you. 
The brief I was given was that the recipient likes netball and monkeys. The client wanted a funny card with monkeys on so I used a digistamp set available from KPM Doodles  and imported the required elements into Serif Craft Artist. I added a netball and a hoop and adapted the hanging monkey so that he was holding the ball over the hoop. I printed the images onto Neenah Card stock and left it to cure for about half an hour (whilst I had some lunch !!) . 

On Thursday, I saw one of Leann Chivers Spectrum Noir shows on Create & Craft and she suggested using your alcohol pens on top of a wad of paper, so I tried this with my promarkers and have to say, was very impressed.

I also need to thank Darcy  for her help in directing me to a blog where I was able to get a blending chart for my promarkers. I followed the chart and am really pleased with how the leaves and tree trunk have turned out, so thank you Darcy xxx


When I design a hybrid card in Serif, I set my page up to suit the size card I am making. Without deleting the images, I then draw a rectangle and add any wording I want to use on the front. I used the 'bevel & emboss' function for the wording, matched the colour to a shade in the netball and created a second rectangle of solid colour. I know I could have done it in one go, but I wanted to mat & layer hybrid style. 


I then printed out just the sentiment topper and layered it up. 

I am loving the mini perfect layers ruler set and the 1/16th setting is my favourite right now. Just enough of an edge to make the image pop, without it overpowering the whole card. 

Hope you like it and thank you for stopping by my blog today x


post signature

Monday 17 March 2014

Cogs Birthday card for a male

I had a commission for a male birthday card but had no brief -
so went with my gut instinct because there aren't many males that don't like cogs lol


I started with a square of centura pearl card and worked on the reverse side.
I used Old paper Distress ink over the entire surface and spritzed it with water. Left it a second or two to react with the the ink then dabbed it off with paper towel. After this I took a stencil and inked over with frayed burlap distress ink. Whilst the stencil was still in place, I used a piece of bubble wrap in my hand and Black soot distress ink to randomly stamp through the stencil.

I then gave it all a good dry with a heat tool. I scraped all round the edge of the topper with a scissor blade and edged it with Black Soot Distress ink.


I took some Paper Artsy Grunge Paste and used a Tim Holtz Honeycomb stencil across one corner of the piece. Once it was dry, I used some Copper Treasure Gold on a piece of muslin all over the grunge paste and odd 'swipes' across the page. I then used the same Copper Treasure Gold across 3 wooden cogs. Once it was dry, I scratched some marks into the cogs with various blades and wiped over the cogs with Black Soot Distress ink, Then used Cosmic Shimmer glue to adhere them to the card.

Finally, I added a 'happy birthday' die cut and gently applied Copper Treasure Gold over the top. Matted & layered into black card then applied to the card blank - the edges of the card stock were rubbed over with 'old paper' distress ink 


Hope you like it and thank you for stopping by my blog today x


post signature

Monday 10 March 2014

Arty birthday card

Evening everyone and here is my latest blog post - an Arty Birthday card.

The brief I had for this card included 
music, eccentric, drawing & painting & bright colours.

I started by stamping the field scene using black archival ink and a stamp from HobbyArts  onto watercolour paper and painted it with watercolours. I then used a papermania die to cut the shape. I inked the edges with a combination of spiced marmalade and mustard seed distress inks.


I then used the same die & watercolour paper to stamp the musical stave. This is an old wooden stamp and I love it. No idea on the maker though (sorry) 


I then cut a piece of Centura Pearl card stock and cut 2 apertures using the same die, in the corners.

Then using various distress inks on the reverse side of the centura card stock, I blended them all together to create the first layer of the background.


I then got out my Paperartsy Stencils and spray inks to do the flower.
I actually like the fact that the inks bled slightly under the stencil so I didn't restart.
Once it was dry, I went round the outline with a micron pen.

I then used a stencil brush though the 'holes' to add extra interest. 


Finally, the 'mum' was stamped with Ali Reeve's Distressed alphabet  and the edges of the die cut inked with the same distress inks as before and the same stencil used for effect.
I then matted onto black card to make it stand out more.


I used the same stencil and matting technique on the insert. 


Hope you like it and thank you for stopping by my blog today x 

If you'd like to order your own bespoke card, get in touch via www.isowcards.co.uk 
where you can see all the ordering details and pricing structure


post signature

Sunday 9 March 2014

WANT TO WIN A Poppy Bag for Hillarys Blinds Country Craft Competition

To have a chance of winning this bag, pop over to my Virgin Money Giving page and read about how could be entered into the draw to win this bag  


Via Twitter & Bloglovin, I found out about a competition being run by Hillarys Blinds.
The aim is to cut, stitch & blog your way to a £1000 prize.
Click on the link above to enter - hurry though. The closing date is Monday 17th March 2014

Anyway, I clicked on the link and followed the on screen instructions and a couple of days later, I received my sample of 'wild poppy' fabric. It is beautiful fabric full of artistic poppies and has a really nice 'weight' to it. Perfect for cushion covers, chair covers, light upholstery etc etc etc. 

I am not a prolific sewist so went for something I have made before and opted for a hobo bag.


Unfortunately, I cannot remember the pattern designers name as I bought the pattern a couple of years ago and transferred all the pieces onto doeflex and put it away safely - so safely, I now have no idea where it is!!

In addition to the wild poppies fabric, I bought some red cotton lining and also some little cute ladybird buttons to sew on for interest, There's 3 dotted about in total. 

I added a magnetic clasp for security and an inner pocket, as they are always handy.
The bottom of the bag has been 'sugar bagged' (as Mandy Shaw would say) so it will hold quite a bit and stand nicely. I have put some wadding in between my layers to give it more 'oomph' but this isn't necessary - interfacing would work (and in fact it does as my original bag is made that way).


I had a couple of issues with the handles, but I persevered and think they are okay.
As I said to my best mate, Jax, earlier, 'it's not perfect, it's rustic' :-) 
It is a one off, so totally unique, along with all its little imperfections that you WILL  come to love :-)
(honestly)


I like to try and raise money for different charities as and when I can, so when I can figure out how to do it, both logistically and legally etc etc, I will possible raffle this bag for The Poppy Appeal 

Hope you like it and thank you for stopping by my blog today x


post signature

Thursday 6 March 2014

Simple, quick & easy cosmetic bag


I get a regular daily email from 'sewing it up' and there are loads of links to blogs etc with a multitude of sewing projects for people of all abilities to tackle.

Yesterday I saw this project from Quilters Enjoy Colour going back to October 2013.  


For mine, I stitched 2 fat quarters together instead of using the width of the fabric as mentioned in the original tutorial but I think it was worked out ok. 


Hope you like it and thank you for dropping by my blog today x


post signature

Hobby Art Sunflower Card

 Have been off work today (& yesterday) feeling poorly so this afternoon I wanted to do something simple.
And here is what I have done.


I used one of the stamps from HobbyArt Sunflower Set. Stamped it direct onto the topper and then stamped it onto a piece of paper and cut it out to create a mask. I gave it a light spray with some crafters companion stick and spray re-positionable and left it a minute or two to 'air'.


Once the image was masked I put a couple of strips of masking tape across the card to leave a gap and used an inkylicious dusting brush and Spiced Marmalade Distress Ink to create the banner. Then I used a small flower mask and Wild Honey Distress Ink to create the flowers.


I then removed the mask and used Derwent Academy colouring pencils to colour the flower itself.

Hope you like it and thank you for stopping by my blog today x


post signature