Planner Dashboards available in various sizes

Planner Dashboards available in various sizes
Visit my Etsy Shop

Thursday 26 September 2013

DragonsDream TIO challenge - Vintage/lace/buttons/ games


This week over on Dragons Dream TIO Blog Challenge  the theme for the tag is 'Games' along with 'Vintage, lace & Buttons' so here is my entry.

I used Distress inks to colour my background then used a splat stamp from Inkydoodles with blacksoot inkpad.

The scrabble tile stamp set is from Ali Higginbottom

The lace flowers were from my stash box and I attached them to the buttons with flowersoft wires.


I'd like to enter this into this weeks challenge on DragonsDream TIO 


post signature


Monday 16 September 2013

Stamp Storage Box


If you follow Darcy on her wonderful blog , you will have seen her fantastic idea's for recycling boxes to create more storage (lets face it, we all need storage).

So I needed some storage for the variety of acrylic stamps I have from various companies.
A friend of mine gave me some boxes that would normally be thrown away at the hospital where she works and they are the perfect size to fit A5 plastic wallets.


I started by covering the box in 2 coats of gesso.
Once dry, I used a mask with Tesco Every Day Value All Purpose Filler to create the lattice work.
Stupidly I did the sides then realised that I will be putting the boxes side by side so there's no real need to do this (so the next one won't have it).


Once it was all dry, I painted papermania 'linen' acrylic paint over and left it to dry.
Then, using a sponge, I used Tesco Go Create metallic paint in gold, copper & purple randomly over the front to give a 'weathered' effect.

Finally I used some copper Liquid leaf over the raised area and added 
the book-plate with a handwritten label 


Thank you for stopping by my blog today x


post signature

Sunday 15 September 2013

Ali Reeve Card topper made into a card by me


Last week, I was lucky enough to be have my email pulled out of the Create & Craft spotty potty and won a beautiful card topper by the very talented and creative, Ali Reeve from Stamps Away.

So today, I have turned Ali's card topper into a card.

Only recently, I asked Hayley from Dreamees to make me a sentiment stamp after I had the thought a few days whilst doing a tag for a blog challenge, so you can imagine how delighted I was with the card topper as it fits the sentiment to a tee.

I used some Bundled Sage distress ink on the card stock and layered the topper onto this. I inked the very edge with Black Soot Distress ink. 

Then I went really 'old skool' and made some 3d butterflies from peel off's as it seemed perfect for this card.

Then cut some foliage from black card stock to finish.

Hope you like it and thank you for stopping by my blog today 

post signature

Friday 13 September 2013

'cos I could' journal page


Throughout Twitter land and Youtube, I watch people creating journal pages and think to myself
  'I can't do that' - what a ridiculous attitude to take - of course I can do that.

I needed pages, paint, brushes and stamps - well I have those.

So this is my first official Journal page 'Cos I Could' 

So from now on, my journal is going to be called 
'cos I could'.

This one is made from water colour paints and ivory acrylic paint. I used the cap from a water spray bottle for the circles and the back of a piece of cut & dry foam.

The alphabet distressed stamp set is from Stamps Away

Black versafine ink used too

Hope you like it - I do


post signature

Wednesday 11 September 2013

I'm sorry, I've made a Christmas card


Yesterday I received my Hobby Arts Robin & Friends Stamp set and just had to have a play.

The sentiment stamp is from Just Rite Festive Poinsettia stamp set.

Coloured with promarkers. 

Hope you like it and thank you for dropping by my blog today x


post signature

Sunday 8 September 2013

Autumn Leaves Canvas

Hi everyone, here is this evenings handy work.

Via my friends on Twitter, Jax, Helen, Lin & Sam to name but 4, I came across the Arty Inklings Blog page and decided to have a go at the September Canvas Challenge...

And here it is...........

(the clock doesn't work, the hands are stuck on) 


I used all sorts of acrylic paints in tubes (from Lidls), metallic paints (the children's stuff from Tesco), Papermania acrylic paints and just splattered it on with a 3/4" flat brush, twisting it as I went. 
I also added some Two Tone Golden blue ink into some of the paint to add interest. 

Two of the corners were created simply by mixing some Tesco Value All purpose filler with some acrylic paint and then slapped on with the back of a knife. I also used the filler through the clock face mask.


The foliage and the letters were die cut / stamped and then coloured in the same colour ways as the canvas base, then, once dry, attached with Collall 3d glue.

The wooden hands & cogs were added for interest.

I'd like to enter this into the September Arty Inklings Blog Challenge 

Thanks for stopping by my blog today 
post signature

#sewing 7 inch quilted tablet cover

Hi bloggers and welcome.

Today I had planned on doing a couple of cards but I got frustrated with my software and chose to walk away from it just for today and do something else instead.... wise choice I think.

I chose to make a quilted cover for my 7" tablet using the pink denim jeans that needed loving again.

I also wanted to try out using the space guider thingy gadgety do-dad that came with my machine.
Note my use of the correct technical term there.... very important.

I drew a line at s 45 degree angle first with an air erasable pen (you can just see it still in the photo's but tomorrow it will be gone). The line was my initial starting point and then I simply stitched lines from one side to the other through the denim and the 100% cotton batting


I had followed the instruction in the manual as to how to sew on a button - but by the time I had changed the foot blah blah blah, to sew on just one button, it wasn't worth it, so I did this one by hand.


Once I had decided the position of the ribbon closure, I top stitched around the 2 sides and the top, thus enclosing the ribbon.

Et Voila, 1 tablet cover 

Thank you for stopping by my blog today x

post signature

Saturday 7 September 2013

Dragons Dream Tag It On Blog Challenge

Hello again bloggers. 

I have again joined in with the Dragons Dream Tag It On Blog Challenge
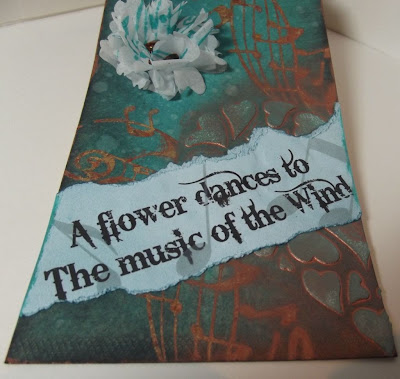
which this week involved Blue, Music and Tissue paper/tape 


I hunted through all my stash of stamps to find a music themed one and came across a good old school wooden one from papermania. 

So, the recipe>>>>

I inked over the tag with various blues from the Distress Ink pad range. I then spritzed with some water and dabbed it off to create the water effect on the background.

I then used some flitter glue on my stamp and stamped across the corners before adding gilding flakes.

The tissue flower is simple made by die cutting a few layers of tissue paper and holding it all together with a brad before sticking onto the tag.


Now for the heart - I used some basic tesco everyday value all-purpose filler through a mask to create the heart. Once it was dry (which wasn't very long) I went over it firstly with Treasured Copper from PaperArtsy, buffed it up then went over again with Creative Expression Patina gilding wax.

The sentiment was typed out from Serif and the edges torn and inked over before attaching to the tag.

I'd like to enter this into the Dragons Dream TIO challenge 

post signature

Stitch & flip Tea cosy

Hi everyone & Happy Saturday.

Had a brilliant morning snuggled under my duvet just because I could.

So once I got up I decided to make a tea cosy for a single person tea pot that I never use BUT the idea was to try out the "stitch & flip" quilting technique. So the brain cells went into overdrive, rotary cutter deployed and sewing machine called into action. 


I used some Daisy fabric 2" strips that I have had for a while. I love the combination and in the past have bought the matching fabric roll and also the matching charm pack which my bag is made from.


Now, my tea cosy isn't insulated -
 A) because I don't have any thermal wadding left and
 B) because my put only holds enough for one decent mug of tea anyway.
So it only has to keep the tea warm whilst it brews.
It is quilted with a nice 100% cotton wadding though. 


The only alteration I would make to any subsequent tea cosy would be to make it an inch or 2 shorter.
Other than that, I am happy with my little sewing venture this morning 

Hope you like it too
Thank you for stopping by my blog today x


post signature

Monday 2 September 2013

DragonsDream Tag It On Blog Challenge

After seeing what some of the #3up team had done on the DragonsDream TIA blog challenge, I thought that I'd have a go too..

The theme this week for the tag is

Nature, Time & Orange. 

As some of you know, I made a faux pas yesterday when painting gesso onto fabric. I then went onto make yet another faux pas but not cutting out the right shape for the bag so I didn't want to waste the fabric I had painted and then stamped up so ran the fabric through my Bigshot to create the flower parts. I then inked them with 'spiced marmalade' distress ink. 


The tag was painted with papermania antigue gold and papermania guava acrylic paint. I then put a couple of drops of Pearl-ex 2-tone re-inker onto my glass mat and dabbed it onto the tag with a bath sponge. 


I used a small clock mask from Ali Reeve in the bottom left hand corner and stencilled
 through with Frayed burlap distress ink.
 The laser cut clock hands were rubbed over with Creative Expressions patina gilding wax.

I stamped the sentiments using stamps from the Visible Image "Time flies" set with sepia versamark onto parchment and cut them into individual words. 


The tag was finished off with some orange & white barbers twine.

I'd like to enter this into the DragonsDream TIO Challenge 

Thank you for stopping by my blog today x


post signature