Planner Dashboards available in various sizes

Planner Dashboards available in various sizes
Visit my Etsy Shop

Monday 15 December 2014

2 more bespoke cards

Evening everyone. Had a nice evening colouring and making up a card and will show you that one later on in the post. For how, here is a card I did for a friend's friend. As soon as my friend gave me the details of the lady the card is for, I immediately knew I have to use 'Blanche' from Saturated Canary for the card - she just fits the bill so well. 

I used promarkers as the base then highlighted certain area's with spectrum noir pencils. The embossing folder was a freebie from a magazine. I used dark purple card then three shades of Treasure Gold to bring out the detail of the embossing. 

The ivy die is from Joanna Sheena and I also used a swirl die but can't remember the manufacturer (sorry). The purple flowers are from my stash.


When I had finished colouring, Blanche, I put the card stock onto a pixscan mat and after scanning and tracing the image, increasing the border by a mm or 2, I cut her out on the silhouette cameo.


And now for the second card that I have made this evening. It is for a man to give to his wife.
The digi stamp is called 'Christmas Shopping Emma' from Pink Gem Designs and I know the lady likes to shop so again, the image fitted the bill perfectly. 'Emma' is coloured entirely with spectrum noir pencils
along with 'zest-it' blending solution.


I started with her face and the hat and kept popping back to add a few highlights as I went along.


I then moved onto her coat. I wanted it to look like a suede coat so added lots of light layers of colour rather than a heavy layer. I also used the same colours for the sleeve cuffs and the boot tops.


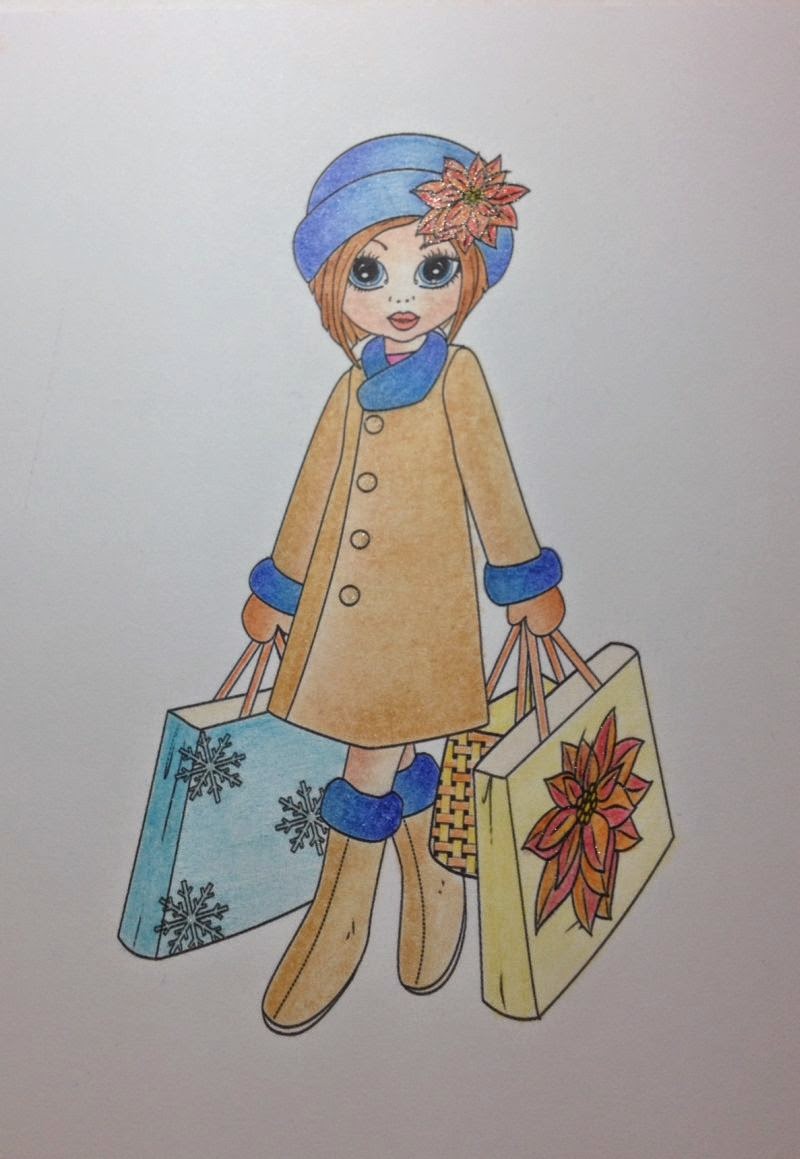
The boots were coloured with the same colours as the coat.
The bags were simply coloured with 1 or 2 colours.

I used a red and an orange for the flowers both on the bag and the hat.


To finish the card, I used a snowflake stamp onto an 8 x 8 blank card using 2 shades of 
adirondack ink pads.
Matted the image onto a piece of light blue card and used another piece of the same card to emboss. I used an ink duster and an adirondack inkpad to bring out the embossing. I then die cut 2 snowflakes from the same blue card stock and once attached to the card, added a card candi to the centre.

I created the tickets in Serif Craft Artist  - note the number of the tickets :-) See what I did there? lolo


Small blue gems added to the coat for the buttons gives it a nice bit of bling. 
And finally, I used a clear Wink Of Stella pen on the flowers and the snowflakes on the bag.


Thank you for stopping by my blog today x


post signature

Friday 21 November 2014

Fabulous gothic birthday card.


Here is the birthday card that I made for my best mate, Jax. I know she loves a bit of purple and gothic so what better digistamp to use than one from the fabulous range by Kenny K 

I used Spectrum Noir pencils throughout for this design along with pencil stumps and blending solution.
The blending solution I currently use is called Zest It Pencil Blend. It has a lovely citrus aroma to it.

The background is simply various distress inks on neenah card stock, sprayed with water and a visible image cracked stamp along the edge. 

Hope you like it and thank you for stopping by my blog today x

post signature

Monday 17 November 2014

It's been a month or more since I last blogged - oops :-)

I used to be so good at blogging on a regular basis - now look at me - bad Cazz :-)  Anyways, here are a few cards I have been working on since I last blogged.

This first one was made using a background created with distress inks, grunge paste through a honeycomb stencil and inked over once dry. The '21' and the sentiment were cut on the silhouette cameo and the wooden cogs added at the end. 

This next card was made for a little lady and I also made a matching make up bag from calico and VersaCraft inkpads. The alphabet stamp set is from Dreamees. 

The topper on the card is from the Frederika CD by Polka Doodles and coloured with promarkers. 


This card was made for Nigel May - it is so him :-)  The whole page was created in Serif Craft Artist 2 and I positioned the Tex Digi stamp by Kenny K where I wanted it on the page then simply printed the while thing off on Neenah cardstock.

I then used promarkers to colour Tex - there was a lot of flesh to colour lolol 

This wedding card was made using a digistamp from Jellypark. There are some lovely digistamps available from Claires site and if you like to make cards to make children smile, there is also a link to the PostPals site, so please pop over and have a look at the Jellypark site.The digital image comes with the 'wedding day' sentiment as part of the digistamp so I took the image into Serif craft artist and added the 'on your' and the names. I used promarkers to colour the image 

This wedding card was a simple, elegant style.. I used a Darice stitched honeycomb embossing folder for the background. A digital stamp for the sentiment and the flowers were cut from the Heartfelt creations sunflower die.

And finally for this posting, this set of 24 Xmas cards are for a bulk order, 6 of each design all created in Serif Craft Artist 2.

Thank you for stopping by my blog today.
Hope you like what you see

post signature


Monday 6 October 2014

Addicted to CAS Challenge card #49 - Stencil

A really quick card this evening. I bought a spritzer ages ago from a shops bargain bucket and only ever got it out of the box once. So, whilst, blog surfing earlier, I came across this weeks Addicted to CAS Challenge for this week - #49 Stencil. So I opened the box, played about on a scrap of paper til I got the nib setting right on my promarker (which I happened to have to hand), dug out a stencil and came up with this 


I then ran the 6" x 6" card through my ebosser with the border embossing folder, and added some double sided tape and gilding flakes to finish.

Hope you  like it and thanks for stopping by my blog today x


Saturday 13 September 2014

Engagement card


Hi everyone, long time no blog, but I thought this card deserved a proper run down and 'ingredients' 

Digistamp - Available from Bugaboo Digi Stamp site 
Backing papers - Prima Botanical collection
Flowers - Serif Craft Artist Pro 2 'African Safari' DigiKit. Resized and copied to suit
Ivy Die - Joanna Sheen Signature Collection 
Spectrum Noir Pencils
Zest-it pencil blend

All images were printed onto cream watercolour lightweight card stock, then I used my pixscan mat and my silhouette cameo to cut them all out.


Hope you like it and thank you for stopping by my blog today x

Monday 4 August 2014

1914 - 2014 4th August. Lights Out at 10pm Uk Time to commemorate the start of World War 1

Today, 100 years ago, the world saw the beginning of World War 1. 

Tonight, between 10pm & 11pm, people are being asked to turn their lights out and light a candle in remembrance of those who lost their lives.

More details can be found here 

http://www.britishlegion.org.uk/remembrance/ww1-centenary/lights-out


I have made this simple card to simply 'Remember'


I created the background using Fresco paints from paper artsy. I watched Leandra do a demonstration on Sunday at Stamperama using a baby brayer so this is my version. I have had the poppy stamp for a long time and I can't remember who it comes from. I think it may be from Sheena Douglass's range.
The leaf die if from one of Sue Wilsons die sets.


I coloured the poppy with promarkers from the latest Ltd Edition Spring / Summer 2014 collection, after I had embossed the stamped image with fine detail gold powder.

I then mounted the background onto black card and left a very thin border before mounting onto matt gold mirri card.

The 'remember' stamp is from HobbyArt Stamps Commemorative set and is well worth a look

I'd like to enter this card into the Addicted to CAS challenge #44 this week.

Hope you like it and thank you for looking 


post signature

Sunday 20 July 2014

Addicted to CAS: Challenge #43 - Celebrate

Good afternoon blogger's, hope this post finds you all well.

Today I have made a card that I am going to enter into the current Addicted To CAS Challenge - The theme this time is - celebrate


I used my silhouette cameo for this card throughout.

I position a 6x6 card blank onto my cutting mat and placed the cutting file where I wanted it to be.

I ungrouped the file so it only cut the outer line from the card blank. This then gave me the aperture. I left the cut out on the cutting mat and using a sketch pen, I placed the word 'Celebrate' 
 and I glued the cut out through the aperture onto the inner leaf of the card.

Leaving everything in place, I highlight the flourish part of the cutting file and used some
shimmer paper to cut the file.


To add interest, I folded the front of the card in half and added a couple of strips of the same paper used for the flourish cut out.


Very clean, very simple.

Hope you like it and thank you for dropping by my blog today x


post signature

CAKE birthday card


Here is the card I have made for one of the chiropractors in town. 
Vicki is full of life and a piece of cake never goes amiss.

The digital stamp is from Redonkadoodles and coloured with Promarkers. I have been following tutorials on YouTube by Kimberly Brown - and am pleased to say, my colouring has got a lot better since doing so. I also use Neenah Card Stock.

The rest of the card was composed in Serif Craft Artist professional 2 and colour matched throughout 

Thank you for stopping by my blog today x


post signature

Wednesday 16 July 2014

July 2014 card round up so far

Hi all, once again, here's a round up of what I have been making so far this July. 

As ever, I have used many different mediums, techniques, tools etc etc etc and I'll give a little bit of info for each one, just to keep the post brief.

First up, Aiden's camper van card.
Van paper pieced for a Silhouette cameo cutting file
Wording cut on Silhouette with matching mat
Backing paper & sentiment designed in Craft Artist Pro 2


Topper is one I have had for many years. Created a line drawing from it and 'drew' it on Silhouette Cameo
Film strip & name created in Silhouette software
Other embellishments from a silhouette cutting file
Photo corners from a Tim Holtz Bigz Die


Digi stamp from Mo Manning, coloured with promarkers.
Background created in Craft Artist Pro 2. Hand coloured with promarkers
Other embellishments from Silhouette cutting file 


Digistamp from Paolaspapers on Etsy
Coloured with promarkers
Backing paper from Craft Artist pro 2
Floral die cuts 


Embossing folder that came with ebosser
Distress inks
Create & Craft dies


Digital image from Polka doodles Digi on Etsy
Coloured with promarkers
Backing created in Craft Artist 2 


Simple sympathy card
main dies - Tonic
various floral dies


Digital image from Redonkadoodles 
Coloured with promarkers
background created in craft artist pro 2


Ta-dah :-) 

post signature


Tuesday 1 July 2014

What I have been doing card wise

A quick over view of some of the cards I made in June

This one was made with masks, craft artist, silhouette cameo, distress inks, stamps and glue :-) 

This one was made with Tonic dies, sizzex dies, ready made flowers, and of course, glue :-)

Hunkydory topper and backing paper for this one. Create &Craft die for the butterflies (& glue) 


This card was made using Silhouette print & cut technique.
The beautiful princess digistamp is from Art By Miran available from her Etsy Store
The lattice at the back was from the silhouette store and I also used various dies for the leaves & flowers

This card used a honeycomb lattice from the silhouette store.
The flowers and leaves are from Fred She Said   I have used designs from this lady for many years and they are always a delight to use. I used the silhouette print & cut technique


post signature


Wednesday 11 June 2014

Sympathy card


A friend of my parents has recently passed away so my mum asked me to make a card for her to send to Fred's family. As mum only rung me this evening and wants to pick it up tomorrow, I again reached for the Kanban box and used this simple lily topper. 

The backing paper is one from my PC, its actually a scanned image of a paper bag that was so pretty, I didn't want to waste it. I imported the jpeg into Serif Craft Artist pro 2 and altered the colour to match in more with the topper. I then overlaid a digiboss layer to create the illusion of swiss dots. 

I added the gold & orange border and used the digiboss "with deepest sympathy" image from Serif.

I printed the sheet out then created a plain square using the same colour as for the gold border. I printed this out onto super smooth paper (after creating a white square in the centre to save ink).

The 2 pages were matted together and the topper placed on top.

I printed the verse onto white card stock and matted onto matt gold mirri card and used a small flourish die twice to create the upper & lower border. 


post signature

Tuesday 10 June 2014

Rush birthday card order

Hi everyone, yes I am still about in blog land :-) 

I needed to make a quick card for an order so dug deep into my Kanban box and found this topper and matching backing card.

To create the background on the white card blank, I inked through a honeycomb stencil that I had cut on my silhouette cameo. I used a light dusting of spiced marmalade distress ink to bring out the pale orange in the rose on the topper.

The birthday sentiment is one of Ali Reeve's from her washables range.

The topper, backing card and sentiment were matted onto pale pink heavyweight paper/light card from Lidls. If you see this cardstock for sale in your local Lidl's, grab it. There are an array of colours in each pack and its lovely to work with. The butterflies were cut from the same pale pink cardstock using a Create & Craft Die-Lectables die - lace butterflies.

Hope you like it and thank you for stopping by my blog today x


post signature